Mac 使用技巧
1582字约5分钟
2024-10-26
本文记录了 Mac 使用过程中的一些使用技巧。为的是在以后重装系统能够快速找回熟悉的环境。
软件安装类
homebrew
话说 homebrew 作者有一段奇特的经历:Max Howell 被谷歌面试挂因为他没做出一道反转二叉树的算法题 🤣(大概意思是 ”虽然我们90%的工程师都用你写的软件,但抱歉我们不能聘用你,因为你无法在白板上写出翻转二叉树。“,所以一份工作的胜任度到底是实在的工程能力呢,还是所谓面试的应试能力呢?🤔 不过作者不是科班出身,是学化学的,情有可原哈哈)
Mac 下包管理器,官网脚本安装 https://brew.sh/
GO
这里就直接用 cursor/vscode 做编辑了,懒得弄 GoLand 了。
- homebrew 安装
brew install go - 设置国内代理
go env -w GOPROXY=https://goproxy.cn,direct - vsc cmd+shift+p 安装 go-tools
- 扩展商店安装 GO 插件
- enjoy it.
markdown 写作类
通过 terminal 打开 typora
在安装 cursor 后,很喜欢在 terminal 输入命令
cursor <path/to>来打开 cursor,但 typora 是没有相关指令的。可以利用open -a <app>的命令打开某个 app。这样可以通过终端达到typora <path/to>的效果。
echo 'alias typora="open -a Typora"' >> ~/.zshrc
source ~/.zshrc
利用 Typora + COS + PicGo-core 完成 md 图床写作
使用 typora 进行写作时,将图片自动上传到云端(腾讯云对象存储 COS)。这样 markdown 传播就不需要带上一堆 assets 了 😃 最早的时候是用免费的 Gitee 的,不过给中途改成私有的 😠 让我带着房子跑路,那就用 COS 吧这么点流量也要不了几个钱 💰
node 安装 pico
pnpm install picgo -gpicgo 配置 COS 相关 KEY
vim ~/.picgo/config.json使用 v5 版本 API- secretId, appId, secretKey: https://console.cloud.tencent.com/cam/capi
- Bucket, area: https://console.cloud.tencent.com/cos/bucket
- path 自定义,带上 /
{
  "picBed": {
    "uploader": "tcyun",
    "current": "tcyun",
    "transformer": "path",
    "tcyun": {
      "secretId": "xxxxxxxx",
      "secretKey": "xxxxxxxx",
      "bucket": "xxxxx-xxxxxx",
      "appId": "xxxxxxx",
      "area": "xx-xxxxxx",
      "path": "imgs/",
      "customUrl": "",
      "version": "v5"
    }
  },
  "picgoPlugins": {}
}
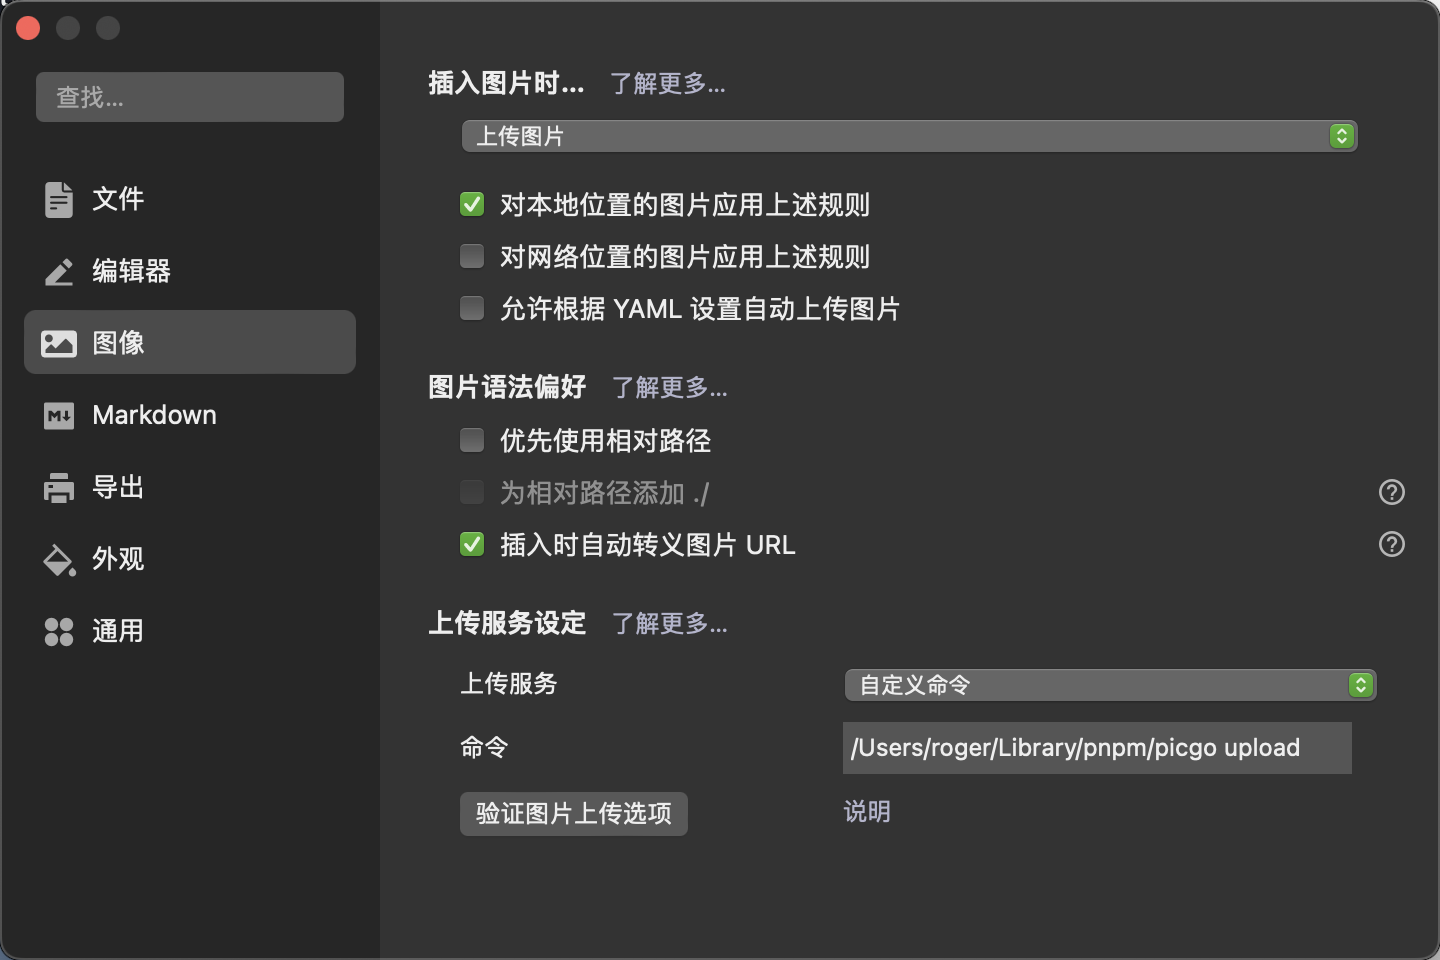
设置 typora 插入图片——上传,上传服务设定自定义命令 picgo upload;自带的 picgo-core 咋调都不行 🙅♂️(怀疑是不是环境路径的问题,不管它了,用自定义命令绝对路径完事了),这里不用下 picgo.app,这个还需要后台运行。

typora 插件
偶然居然发现了 typora 的插件,两个仓库,一个支持 Mac,一个不支持。一个功能好多啊羡慕🥹
【MAC not OK】https://github.com/obgnail/typora_plugin
【MAC OK】https://github.com/typora-community-plugin/typora-community-plugin
说说这个支持 Mac 的吧,参考的是 Obsidian,双厨狂喜 😁,安装有点繁琐,但仓库教程很细致,好评。
- 有几个按键风格和圆角矩形和 Mac 版不搭,随便抓了下 h5 把这些 css 加到 core.css 后面舒服了。
.typ-modal{border-radius: 15px;}.typ-sidebar .typ-nav__item{cursor: pointer;}.context-menu{border-radius: 15px;}.typ-ribbon-item {cursor: pointer;}- front matter 这个插件很好用,搭配 hexo 生成博客非常减轻负担。之前用过 obsidian 一段时间,功能很强大,但不知道为什么,换过许多主题,码字和排版总让我感觉不如 typora。
typora 浮动工具栏
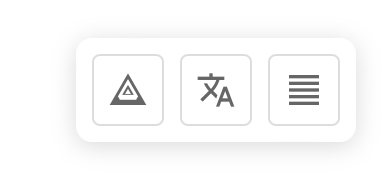
想要一个能在 typora 下写完直接按按钮就能够部署博客的功能,但网页端 js 执行 shell 是有限制的,所以通过调用接口的方式来实现,所以不可避免地要分前后端。
前端
受到插件实现的启发(本来想用插件里面的模板写的,奈何好像开发并没有 Mac 的环境,调了调插件也没生效,思考着自己想要的效果也不需要用到插件的 API,索性就直接写了),为 typora 简单添加一个浮动工具栏,方便后面在 typora 直接调用接口实现博客一键部署集成,通过 cursor 写了一版代码,添加至 Applications/Typora.app/Contents/Resources/TypeMark/index.html 中,效果不错;暂时先这样吧,后面考虑用 ts 改写通过 html 注入 js 的方式完成。

<!-- 添加浮动工具栏 -->
<div id="float-toolbar"
	style="position: fixed; bottom: 20px; right: 20px; background: var(--bg-color); padding: 8px; border-radius: 8px; box-shadow: 0 2px 12px rgba(0,0,0,0.15); display: flex; gap: 8px; z-index: 1000;">
	<button onclick="typoraServe();"
		style="width: 36px; height: 36px; border-radius: 4px; border: 1px solid var(--border-color); background-color: var(--bg-color); display: flex; align-items: center; justify-content: center; cursor: pointer; padding: 0px; transition: 0.2s;"
		onmouseover="this.style.backgroundColor='var(--hover-bg-color)';this.style.borderColor='var(--border-hover-color)'"
		onmouseout="this.style.backgroundColor='var(--bg-color)';this.style.borderColor='var(--border-color)'"
		onmousedown="this.style.backgroundColor='var(--active-bg-color)'" onmouseup="this.style.backgroundColor='var(--hover-bg-color)'">
		<svg xmlns="http://www.w3.org/2000/svg" viewBox="0 0 24 24" width="20" height="20" style="color: var(--text-color);">
			<path
				d="M12 2L1 21h22L12 2zm0 3.45l6.04 10.38-1.19 2.04h-9.7l-1.19-2.04L12 5.45zm0 3.46l-3.5 6h7l-3.5-6zm0 2.47l1.75 3H10.25l1.75-3z"
				fill="currentColor"></path>
		</svg>
	</button>

	<button onclick="typoraDeploy();//command/translate"
		style="width: 36px; height: 36px; border-radius: 4px; border: 1px solid var(--border-color); background-color: var(--bg-color); display: flex; align-items: center; justify-content: center; cursor: pointer; padding: 0px; transition: 0.2s;"
		onmouseover="this.style.backgroundColor='var(--hover-bg-color)';this.style.borderColor='var(--border-hover-color)'"
		onmouseout="this.style.backgroundColor='var(--bg-color)';this.style.borderColor='var(--border-color)'"
		onmousedown="this.style.backgroundColor='var(--active-bg-color)'" onmouseup="this.style.backgroundColor='var(--hover-bg-color)'">
		<svg xmlns="http://www.w3.org/2000/svg" viewBox="0 0 24 24" width="20" height="20" style="color: var(--text-color);">
			<path d="M9 16h6v-6h4l-7-7-7 7h4v6zm-4 2h14v2H5v-2z" fill="currentColor"/>
		</svg>
	</button>
</div>

<script>
	function typoraDeploy(text) {
		fetch('http://localhost:23333/deploy', {
			method: 'POST'
		})
			.then(response => response.text())
			.then(data => {
				alert(data);
			})
			.catch(error => {
				alert('请求失败: ' + error);
			});
	}

	function typoraServe(text) {
	fetch('http://localhost:23333/serve', {
		method: 'POST'
	})
		.then(response => response.text())
		.then(data => {
			alert(data);
		})
		.catch(error => {
			alert('请求失败: ' + error);
		});
	}
</script>

<!-- 添加拖拽功能的脚本 -->
<script>
	const floatToolbar = document.getElementById('float-toolbar');
	let isDragging = false;
	let currentX;
	let currentY;
	let initialX;
	let initialY;
	let xOffset = 0;
	let yOffset = 0;

	floatToolbar.addEventListener('mousedown', dragStart);
	document.addEventListener('mousemove', drag);
	document.addEventListener('mouseup', dragEnd);

	function dragStart(e) {
		initialX = e.clientX - xOffset;
		initialY = e.clientY - yOffset;

		if (e.target === floatToolbar) {
			isDragging = true;
		}
	}

	function drag(e) {
		if (isDragging) {
			e.preventDefault();

			currentX = e.clientX - initialX;
			currentY = e.clientY - initialY;

			xOffset = currentX;
			yOffset = currentY;

			setTranslate(currentX, currentY, floatToolbar);
		}
	}

	function setTranslate(xPos, yPos, el) {
		el.style.transform = `translate3d(${xPos}px, ${yPos}px, 0)`;
	}

	function dragEnd(e) {
		initialX = currentX;
		initialY = currentY;

		isDragging = false;
	}

	// 添加双击隐藏/显示功能
	let isHidden = false;
	floatToolbar.addEventListener('dblclick', () => {
		const buttons = floatToolbar.querySelectorAll('button');
		if (isHidden) {
			buttons.forEach(btn => btn.style.display = 'flex');
		} else {
			buttons.forEach(btn => btn.style.display = 'none');
		}
		isHidden = !isHidden;
	});
</script>
后端
这里后端就比较简单了,基本就是透传执行 shell,还是用 Go 写吧。居然现在自己的电脑没 Go,这样一想也一年半没写过 Go 了🤣,Go 自己总共就写了一年。版本现在是 1.23,想我上次用版本还是预览版的 1.19 啊,我想这就是时间流逝的具象化吧。


